Figure 1
STEP 1: Load kara02.lwo into Modeler (if you have not followed the previous sections, you may load kara02.lwo from the CD-ROM).
STEP 2: In the Body layer, select the "Kara Eye Socket" surfaces, and type the = sign to Hide all unselected geometry. Then go to an empty layer and make the Body layer a background layer. Zoom in on the eye socket geometry. We can use this geometry as reference for the curve of the eyes.
STEP 3: Type Shift-o to activate the Ball tool (Create > Objects > Ball). Holding down the Ctrl key to keep the radius equal in all directions, left-click in the Top View and drag to the right until the curve of the Ball matches the curve of the elf-girl's left eye socket. Left-click and drag on the crosshairs to place the Ball, lining up its curve with the curve of the eye socket. Holding down the Ctrl key, left-click in the Back View to make this ball three-dimensional. Keep holding down the Ctrl key; left-click and drag on the bounding box of the Ball until its curve best matches that of the eye socket. Then type n to bring up the Ball's Numeric panel. Give it 16 Sides and 10 Segments (enough Sides to keep the ball looking like a ball when converted to SubPatch surfaces; enough Segments so that the smallest segment fits the dimensions of the iris of the elf-girl in the model sheet). (Figure 1)
Figure 1
You might use the following settings:
    Type: Globe
   Sides: 16
Segments: 10
Center X: 32.904mm
       Y: 1.5099m
       Z: --46.2669mm
Radius X: 46.1701mm
       Y: 46.1701mm
       Z: 46.1701mm
STEP 4: Hit the Tab key to convert this geometry to SubPatch surfaces. Rotate it 90 degrees in the Right View. Move it in the Top View and Back Views so that it fits in the eye socket. In the Top View, select its rearmost half (the half closest to the positive Z axis) and type x to Cut it out. Then Rotate it from what used to be its center, until its smallest segment fits over the iris in the model sheet in the Back View. (Figure 2)
Figure 2 |
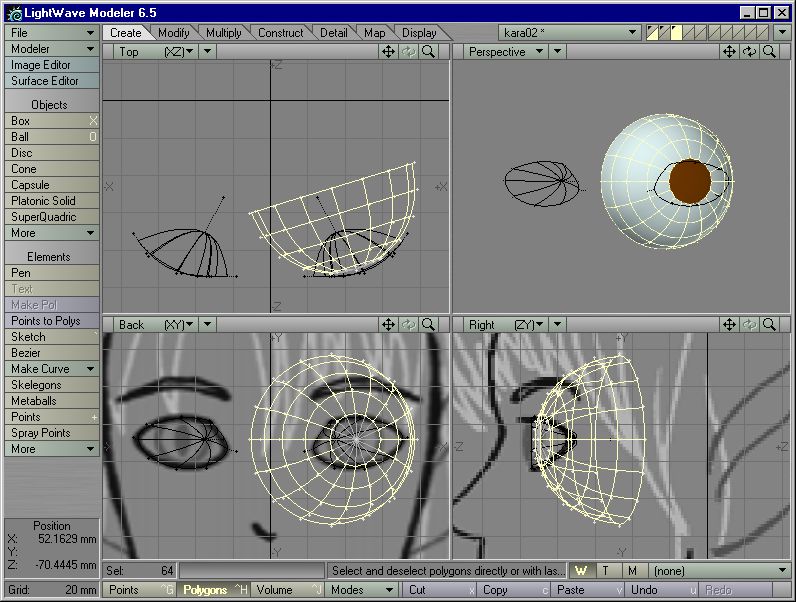
Figure 3 |
STEP 5: Select this smallest segment. Give it the surface name of "Kara Iris (Left)." Invert your selection by typing the double-quotes key, and give this selected geometry the surface name of "Kara Eye White." (Figure 3)
Let's make the iris a bit rounder. Right now it lacks a smooth border.
STEP 6: Select the "Kara Iris (Left)" geometry. Activate the Smooth Shift tool, and right-click on this geometry once. Activate the Size tool. Move your mouse pointer over the point in the center of the iris, left-click and drag to the left. Stop when the border of the iris SubPatch surfaces fits the ink line of the iris in the model sheet. (Figure 4)
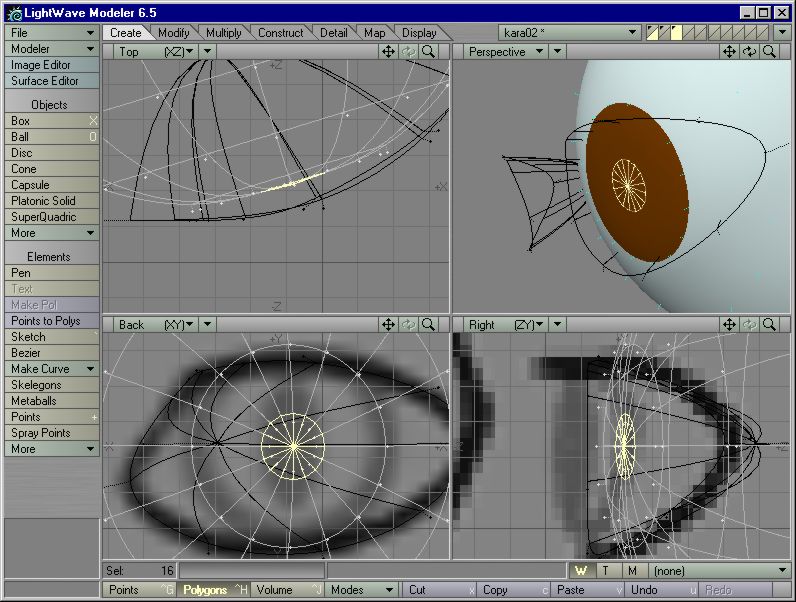
Figure 4
STEP 7: Select all eye geometry. Make the Body layer an additional active layer. Type the backslash key ("\") to Unhide all hidden geometry; see how the eye currently fits in the socket. Move it to its best possible fit if necessary.
STEP 8: Return to the eye layer; make it the only active layer
again. Mirror it across 0m on the X axis leaving "Merge Points" unchecked.
Deselect everything; select part of the new "right" eye and type ] to Select
Connected geometry. Cut and paste this eye into a new empty layer. Select
the geometry with the surface name of "Kara Iris (Left)"; type q and surface
this geometry with the new surface name of "Kara Iris (Right)." (Figure
5)

Figure 5 |
Figure 6 |
STEP 9: To the elf-girl's left eye geometry, assign a weight map called "Left Eye." To the elf-girl's right eye geometry, assign a weight map called "Right Eye." (Figure 6)
STEP 10: Type Shift-y to bring up the Layers panel. Label the appropriate layers "Left Eye" and "Right Eye." (Figure 7)
Figure 7
STEP 11: Save this object as kara03.lwo.