Figure 1
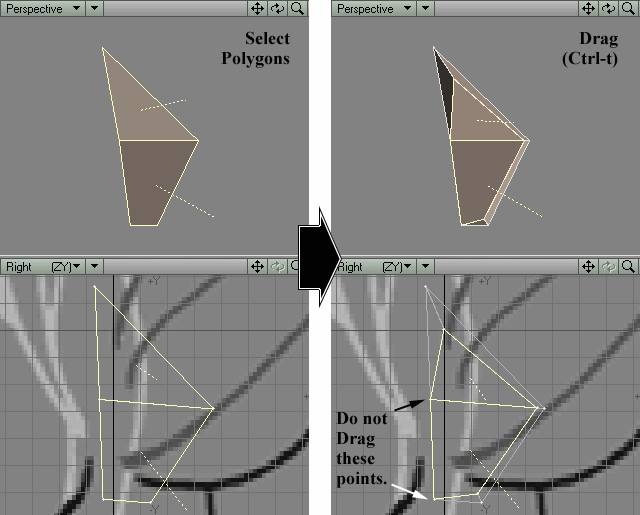
Figure 2
At least one or two modelers have successfully spline modeled ears in the past, but they wound up editing so many points in their spline cages that they lost any advantage splines might have over other techniques. Spline modeling draws its power from using fewer points than other techniques to get the same results. (The modeler who has only ten points to edit gets to go home earlier than the modeler who has to spend his time tweaking 100 points).
Note: Use the fastest tool that gives you the best results. If you can create the geometry you need most quickly from a primitive, then do so. (You can Bevel a hand from a box; you can use the Seashell tool to help you model the scroll of a violin). If you can derive the geometry you want from existing geometry, then do so. (You can quickly BandSaw "fabric trim" into sleeves and skirts). However, if you cannot quickly and easily create the geometry you need from either a primitive or existing geometry (a human head, a human torso, a tunic, an American gallon-of-milk container), then use splines.
As a celshaded object, one might get away with modeling the ears separately, then burying the ends of the ears in the mesh of the head. However, by making the ears part of the mesh, we will guarantee smooth shading where the ear meets the head. A separate ear mesh buried in the head might have an abrupt angle where the ear emerges from the head. When half-shadowed, that "seam" might look odd for a "hand-painted" cel.
So...let's have our elf-girl "grow" an ear. Fortunately, she does not have the complex humanoid ears of Elfquest. Such ears might require us to create a separate ear mesh (as with the hand) to Skin on to the head later. Our elf has the simple, feline ears of Lodoss and Phantasy Star. We can quickly Smooth Shift such an ear from the existing geometry with little fuss.
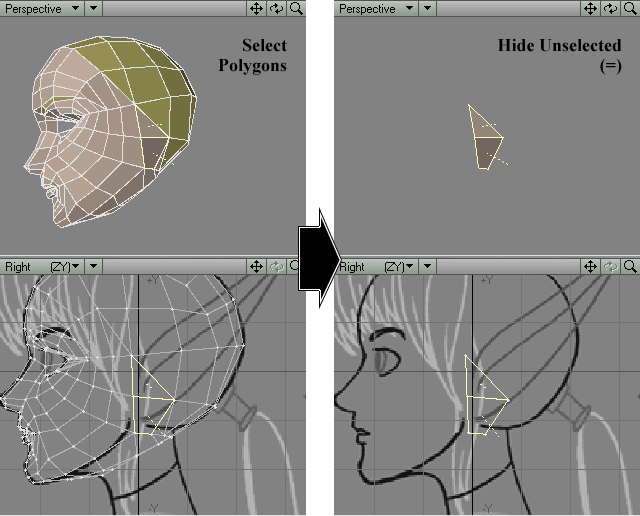
STEP 1: Load head08.lwo into Modeler. (If you did not follow the steps in the previous section and just want Smooth Shifting experience, you may load head08.lwo from the CD-ROM).
STEP 2: Turn off SubPatch surfaces by tapping the Tab key. Select
the two skin-colored polygons closest to the root of the ear in the Right
View's model sheet, and type = (the equal sign) to Hide all unselected
geometry. (Figure 1)
|
Figure 1 |
Figure 2 |
STEP 3: First, we will create the cross-section of an ear -- "root" polygons from which we can grow the ear. Type Shift-f to activate the Smooth Shift tool. With both polygons selected, right-click on them once to cause a slight Smooth Shift. Leave both polygons selected. Do not move the lowest two of the points on the --Z side of the ear in the Right View -- leave them in place. In the Right View, use the Drag tool to move all other points of the selected polygons inwards, roughing out the cross-section of an ear. (Figure 2) The thinner this cross-section, the thinner the ear will be.
Note: The cross-section of this ear is the backwards shape of a "C," not an "O." This is why you must leave those two points in place. We'll get rid of them in the next step.
STEP 4: Each of the two points that we did not move overlap (or nearly overlap) one of the original six points bordering the ear.We have two pairs of points, then, that each look like a single point (or nearly look like a single point). In Points Selection Mode, Weld each pair of points into a single point.
By Welding those pairs of points together, we stole two points from the thin four-point polygon that they defined, leaving behind a two-point polygon. We have no use for this polygon.
STEP 5: Deselect everything in Polygons Selection mode, select this two-point polygon and delete it. (You might find it easiest to either Lasso this polygon or select all two-point polygons from the Polygon Statistics panel).
STEP 6: This leaves two triangles in the upper part of the ear. They can gain a point and still call themselves SubPatch material. Select these two triangles and add a point to their shared edge. Drag this new point down, to cause a more rounded end in this cross-section. Also, Drag the topmost inner point up to thin out the top edge of the cross-section. It should look like Figure 3.
STEP 7: Now to see the fruits of your labors. Deselect everything.
Hit the Tab key to convert these polygons into SubPatch surfaces. Select
the four SubPatch surfaces that define the cross-section of the ear.
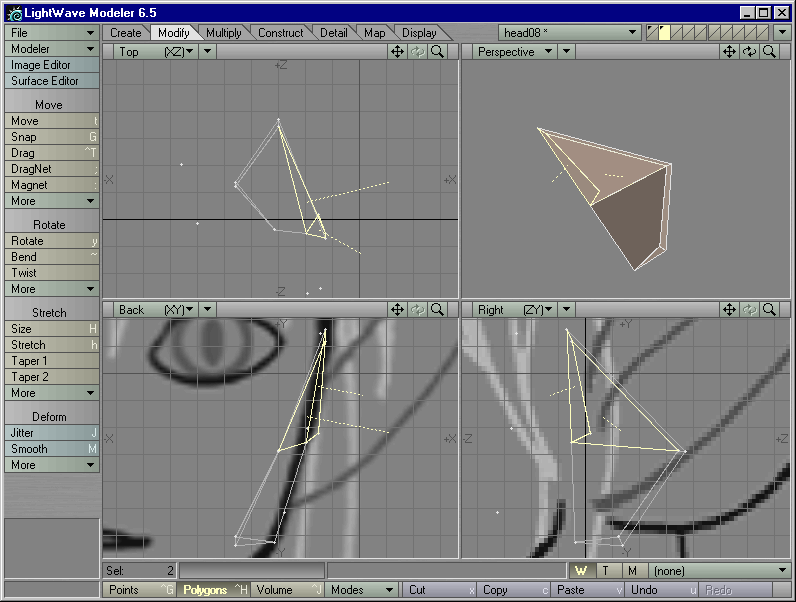
Figure 3 |
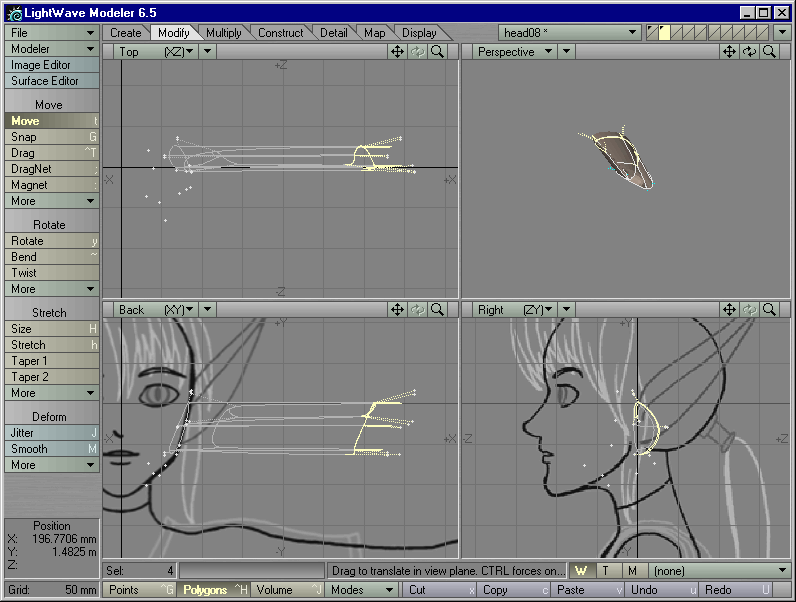
Figure 4 |
STEP 8: Type Shift-f to activate Smooth Shift. Right-click on these SubPatch surfaces once to create a slight Smooth Shift. In the Back View, Move the selected geometry straight away from the head as in Figure 4.
Note that, when not using Move, the Position in the lowest-left corner of Modeler reports your mouse pointer's XYZ coordinates. You should see values hovering around 300mm on the X axis.
We can use this information to guess what value to input into Set Value, to squash these selected polygons flat against a YZ plane.
STEP 9: Type Ctrl-v to bring up Set Value. Input 300mm for the X axis, then click on OK. The points of the selected geometry now runs vertically in the Back View.
STEP 10: Deselect everything. Make a vertical Knife cut through
the ear, close to the head. It should look like Figure
5.
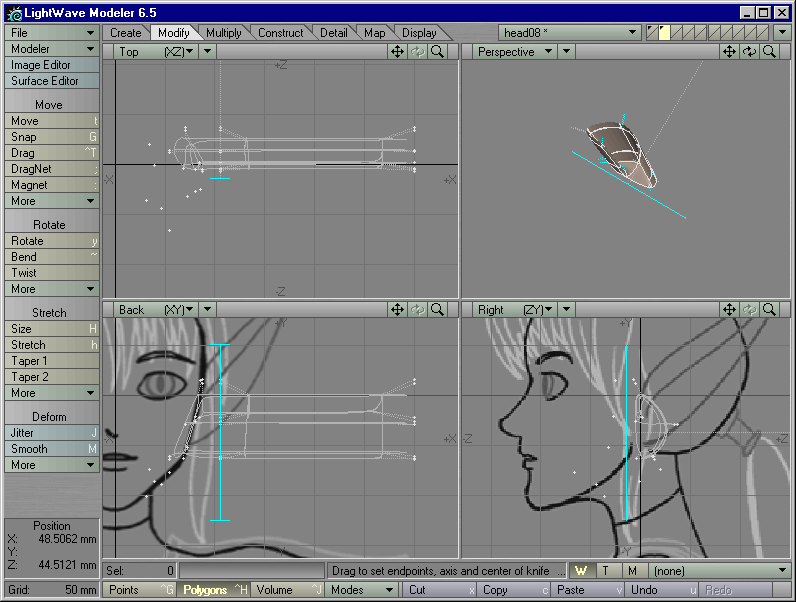
Figure 5 |
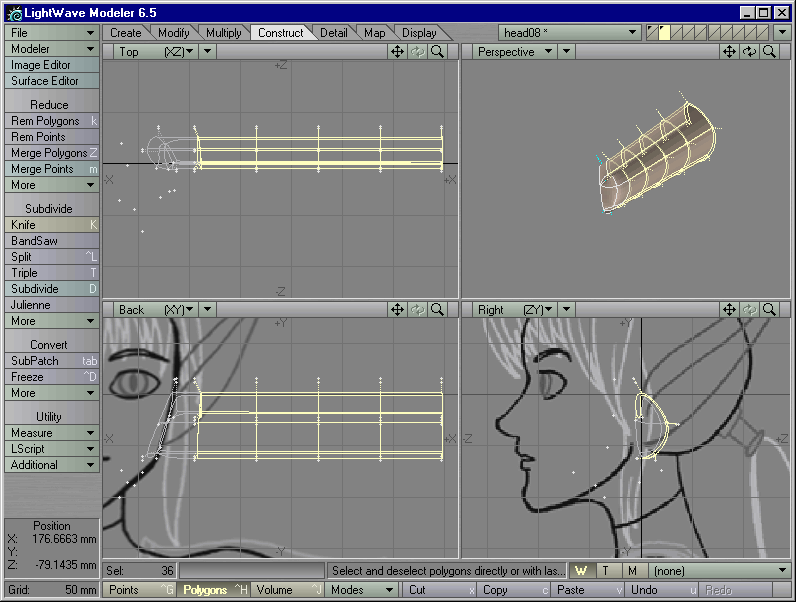
Figure 6 |
STEP 11: Judging from the length of the ear in the model sheet of the Right View, this ear geometry could be a little longer. Select the polygons at the end of the model, and Move them out until their points appear to be the same distance from the root of the ear as the distance shown in the Right View model sheet. Then Cut them out. We're going to Weld the points of the tip of the ear into a single point later on, so we don't need these SubPatch surfaces.
STEP 12: Between the Knife cut you made two steps ago and the outermost points of the ear, select two or more polygons in a row. Use BandSaw to subdivide this band of polygons into four sections, as in Figure 6.
STEP 13: With all but the innermost set of SubPatch surfaces
selected, activate the Taper 1 tool (Modify > Stretch > Taper 1).
In the Back View, right-click on the outermost points of the ear, and drag
to the points of the Knife cut you made a few steps ago. This will set
the falloff of the Taper effect. Tap on the up arrow key until you get
a triangle whose lower edge best matches the top edge of the ear in the
model sheet. Then, in the Right View, place your mouse pointer slightly
in front of the ear, left-click and drag to the left. Everything will be
scaled towards your mouse pointer, curving the ear forwards in the Top
and Right Views even as it gets tapered in the Back View. (Figure
7)
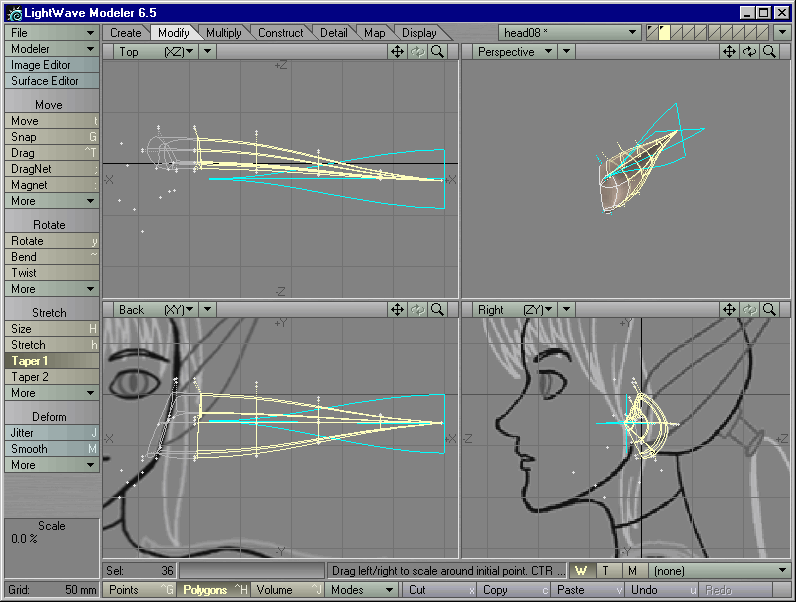
Figure 7 |
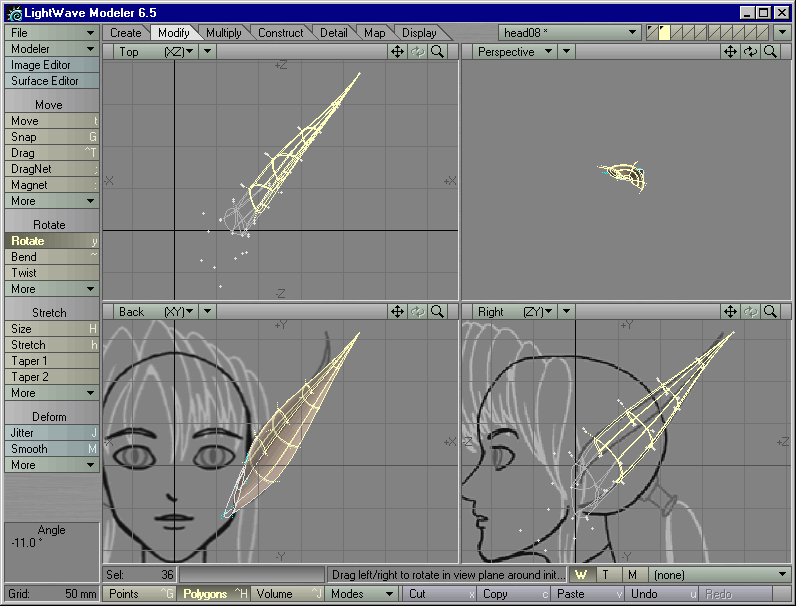
Figure 8 |
STEP 14: Leave these SubPatch surfaces selected. In all Views, use Rotate and the Move tool until the ear looks like Figure 8. Don't move/rotate individual segments if you can help it -- try to get as close as possible to the model sheet by rotating and moving this tapered set of selected SubPatches as a whole, first.
STEP 15: Now let's tweak it. Select the polygons at the tip of
the ear. Use Move and Rotate until it looks like Figure
9. Don't worry if it's too long -- just make sure the curves
of the geometry match the curves of the model sheet.
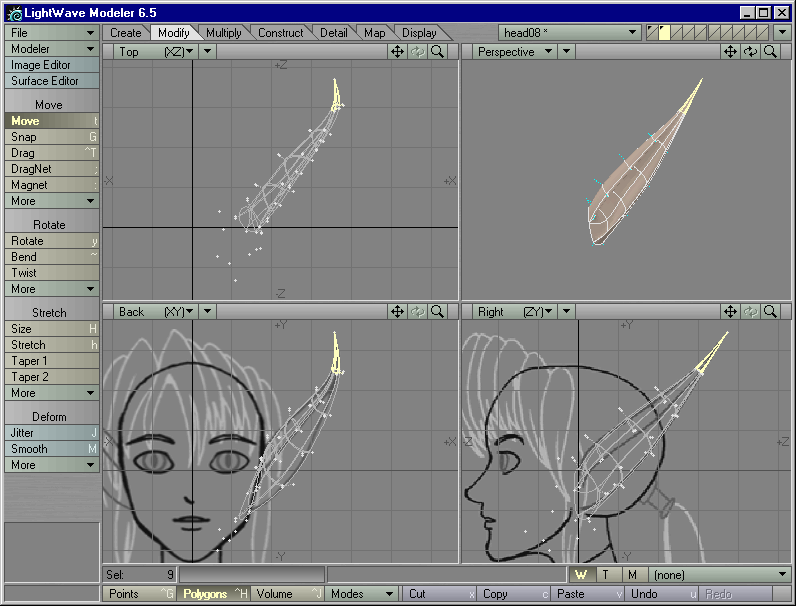
Figure 9 |

Figure 10 |
STEP 16: Deselect the ear tip. Select the next two topmost sections. If they exceed the boundaries of the ink line in the model sheet, use Size to proportionately shrink them, then use the Move tool if necessary to place them back within the ink lines of the model sheet. (Figure 10)
STEP 17: Deselect everything. Select the points of the ear tip.
Move them to the tip of the ear in the model sheet, then Weld them together
into a single point. The SubPatches of the ear tip will flow together and
pull away from the point at the tip of the ear. (Figure
11)
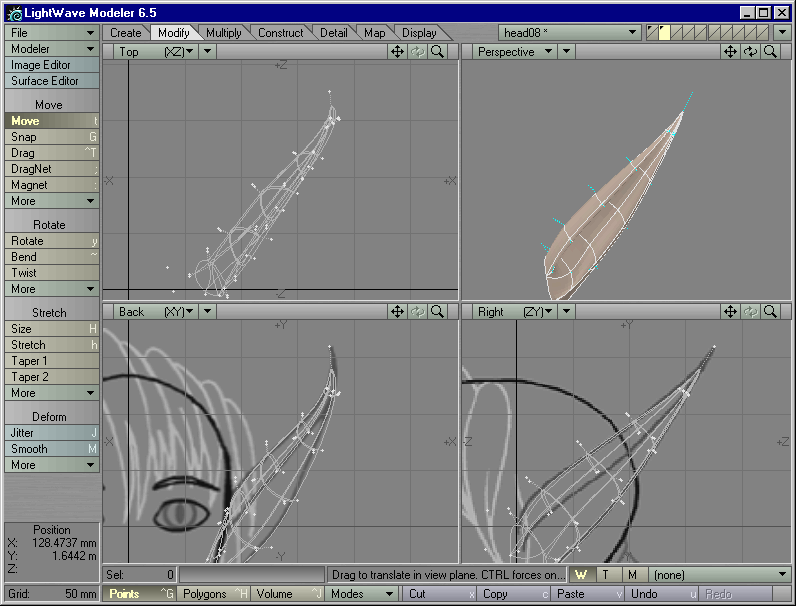
Figure 11 |
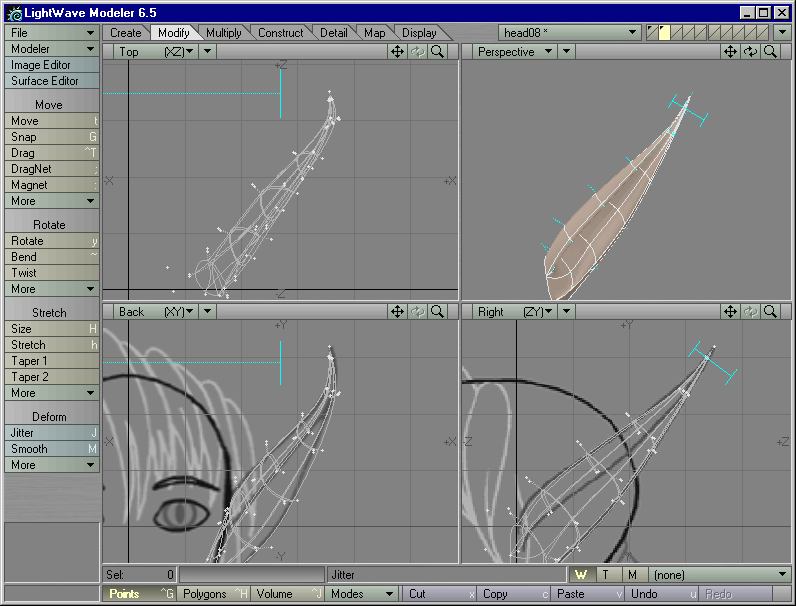
Figure 12 |
STEP 18: Draw the Knife tool just under this point in the Right View. It may not seem like the Knife tool has touched anything, yet the SubPatch surfaces will suddenly snap back into place. (Figure 12)
STEP 19: Zoom in on the ear tip and hit the Tab key to convert all of your SubPatch surfaces back into polygonal faces. You will see your cut near the tip, right through the polygons. Hit the Tab key a few times to switch between SubPatch surfaces and polygonal faces. Note how the SubPatch geometry pulls away from the point at the tip of the ear.
The Knife tool acted not on the SubPatch surfaces, but on the polygonal faces whose points control the SubPatch surface.
STEP 20: Turn off SubPatch surfaces. Unhide everything by tapping the backslash key ("\"). Then turn SubPatch surfaces back on, to see how it looks. It should look something like Figure 13.
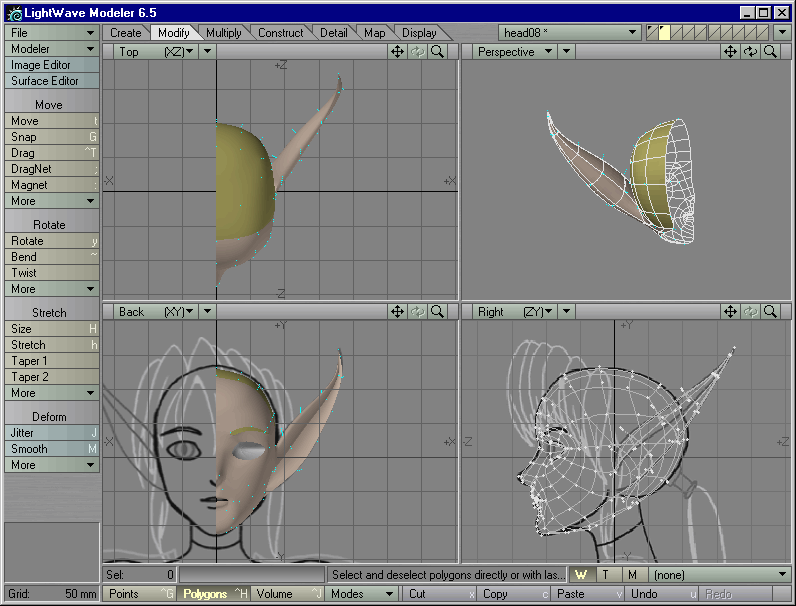
Figure 13
STEP 21: Save this object as head09.lwo.