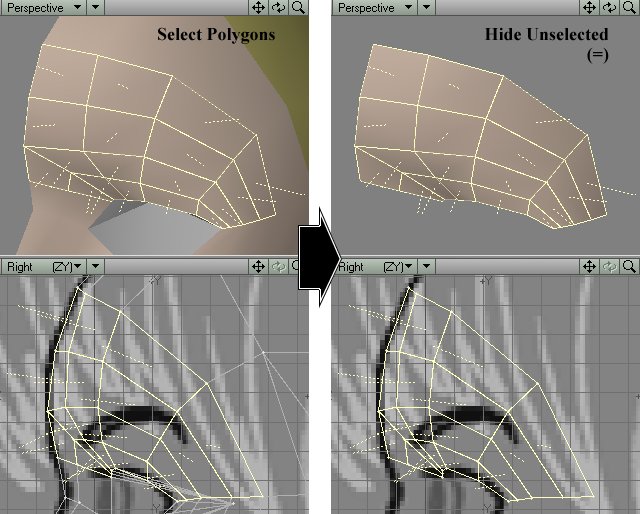
Figure 1
STEP 1: Load head07.lwo into Modeler. (If you did not follow the steps in the previous section and just want detailing experience, you may load head07.lwo from the CD-ROM).
STEP 2: Deactivate SubPatch surfaces by tapping the Tab key. Select the four rows of polygons above the eye that surround the eyebrow on the model sheet; type = to Hide Unselected polygons. It should look like Figure 1.
Figure 1
Leave these polygons selected. Go into Points Selection Mode. We need to blaze a trail through these polygons, and we're going to use a combination of Add Points and Split to do it.
Note: The arcs of the eyebrows in both Views of this model sheet do not line up with each other. In this case, we're following the arc defined in the Back View.When confronted with two views in a model sheet that do not perfectly line up, stay true to the drawing (or the parts of the drawings) that you think looks best, using the other version as a general guide. Celshading isn't about making a render that looks hand-drawn -- it's about making a render that looks like something drawn well.
STEP 3: In Points Selection Mode, Split the quad that hovers
over the innermost corner of the eyebrow in the Back View. This will give
us a diagonal line that roughly follows the inner corner of the eyebrow.
(Figure 2)

Figure 2 |
Figure 3 |
STEP 4: We don't have polygon edges that trace the outermost corner of the eyebrow...so we'll have to create our own. We need a point to represent the outside corner of the eyebrow, so use Add Points to add a point to the shared polygon edge shown in Figure 3. Because all polygons are still selected in Polygon Selection Mode, that point should be added to both of the polygons that use that edge. We now have a point near the outside corner of the eyebrow.
We have also turned those two four-point polygons into five-point polygons...unfit candidates for SubPatch surfaces. We have to Split them into three- or four-point polygons, or else they won't be able to turn into SubPatches.
(And along the way, we'll get our polygon edge for tracing the outside corner of the eyebrow).
STEP 5: Select the points shown in Figure
4 and Split the selected polygons there, forming a diagonal
that runs from corner to corner of the five-point polygons, through the
point you added in the last step. Not only have we Split these polygons
into SubPatch-worthy material, but we have also gained an edge right where
we want it, tracing the outside corner of the eyebrow.
Figure 4 |
Figure 5 |
STEP 6: In the Back View, Drag the row of points closest to the eyebrow into the curve of the upper ink line of the eyebrow in the Back View. Take care, however, not to disturb the arcs formed by the lines of points that radiate outwards from the eye. Keep everything as smooth and as rounded as possible, and move as few points as possible.
STEP 7: Deselect all polygons. Select the five polygons underneath the row of points that define the upper arc of the eyebrow; Cut and Paste them to separate them from the rest of the mesh. Select them again. Use the Drag tool to drag their innermost three points downwards, as in Figure 5 (leaving the corner points alone). Drag these three points until they follow the lower ink line of the eyebrow. Then deselect everything and type m to Merge Points, resealing the corners of the eyebrow. You now have a gap in the rough shape of an eyebrow.
STEP 8: Let's round out the inner corner of this eyebrow. Add
a point to the polygon shown in Figure
6 and Drag the new point out until the inner corner of the
eyebrow-gap has a more "rounded" end.
Figure 6 |
Figure 7 |
STEP 9: Deselect everything. Select only the points that border the eyebrow gap and assign them to a point group called "Kara Eyebrow" with Display > Selection > Grouping > Point Selection Sets.
STEP 10: Deselect everything. Hit the Tab key to see how this eyebrow's looking so far. Use the Point Statistics panel to reselect the "Kara Eyebrow" points group. Edges will later trace these particular curves, so Drag the "Kara Eyebrow" points until these curves look "right" to you. At the same time, try to maintain the the arcs of the forehead so that this model stays as rounded and as dimple-free as possible (Figure 7).
STEP 11: Deselect everything. Turn off SubPatches by hitting the Tab key. We must now fill in this eyebrow gap with polygons. For so few polygons, one might as well go about it point-by-point. Select the leftmost four points of this eyebrow gap in a clockwise fashion and type p to create a single polygon. Use this technique to "fill in" the rest of the eyebrow, four points at a time, until you get to the three points of the outermost corner. Select its three points in a clockwise fashion and type p to create a single triangle. It should look like Figure 8.
Figure 8
Note: Always use the fastest technique that gives you the level of quality that you want. For filling in a tiny gap with one row of polygons, the point-by-point modeling method is fast enough. For filling in a large area with a lot of polygons, use splines -- just build the splines from the existing points, use Knots, and choose the Perpendicular/Parallel settings that match the number of sections in the splines. (The number of sections in the spline equals the number of points in the spline minus one).
STEP 12: Select these "eyebrow polygons." Type q and give them a yellow surface with the name of "Kara Eyebrow," with Smoothing turned on. Then go to Display > Selection > Grouping > Change Part Name and add them to the Part Name selection group called "Separate Mesh." Then Cut and Paste them to separate their edges from the rest of the mesh.
STEP 13: Unhide the rest of the head geometry by typing the \ ("backslash") key. Then hit the Tab key to convert everything back into SubPatch surfaces.

Figure 9
STEP 14: You now have geometry that follows the shape of the eyebrow in the Back View. (Figure 9) Save this object as head08.lwo.