Figure 1
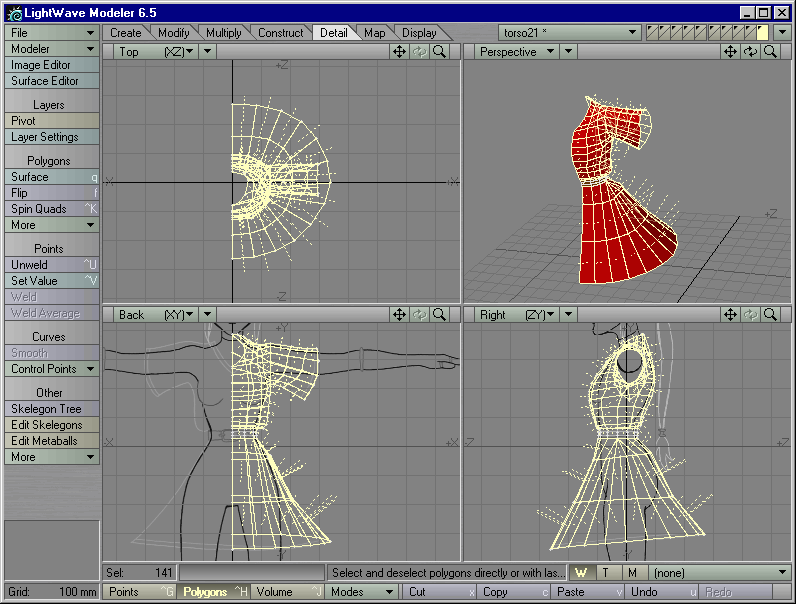
Figure 2
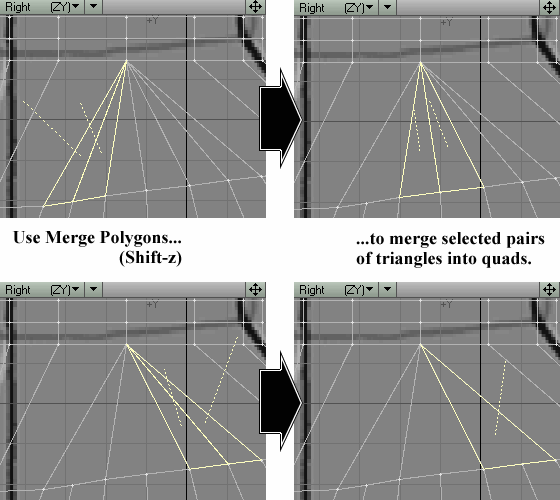
STEP 2: Let's clean up the triangles on the side of the body. Zoom in on the six triangles that lie just under the belt on the left side of the body -- leftovers from the triangle patches.
STEP 3: In the Right View, select the leftmost two triangles
and type Shift-z to Merge them into a single quad polygon. Deselect them,
then select the centermost two triangles. Type Shift-z to Merge them into
a single quad polygon. Repeat for the rightmost two triangles -- make them
a quad, too. (Figure 1)
|
Figure 1 |
Figure 2 |
STEP 4: Surfacing time. Select the polygons that form the belt. Give this a brown surface called "Kara Belt" with Smoothing turned on. Then type the double-quotes key (") to Invert your selection, so that everything but the belt is now selected. Give these polygons a red surface (with Smoothing turned on) called "Kara Tunic." (Figure 2)
The model sheet calls for trim along the collar, sleeves, and hem. We'll handle the easy parts first -- the sleeves and hem. For an easy trim, we'll use Bandsaw.
Bandsaw can be used as either a harmless selection tool (selecting a band of four-point polygons) or incredibly powerful Knife, slicing through all the polygons it selects (and selecting the newly created bands of points for you in Points mode, for good measure). You can make as many cuts as you like in a single pass...but we only need one cut here, along the edge of the hem.
Selecting two four-point polygons in a row will tell Bandsaw in which direction it needs to run ("Auto"). Selecting just one four-point polygon means guessing which "Edge to select" button will send Bandsaw selecting in the right direction -- Odd or Even.
The nice thing about Bandsaw is that you can easily Undo any damage and try again with slightly different settings.
STEP 5: Deselect everything. In the Right View, from the lowest "rung" of polygons at the bottom of the skirt, select two polygons in a row. Activate Construct > Subdivide > BandSaw. Check the box next to "Enable divide," left-click on the "Edit" button to make sure it is activated, then left-click on the red slider and drag it close to one of the edges. Before you click on "OK," click on the "Reverse" button twice just to see what it does. Remember what the "Reverse" button does, as you click on "OK."
Did it work?
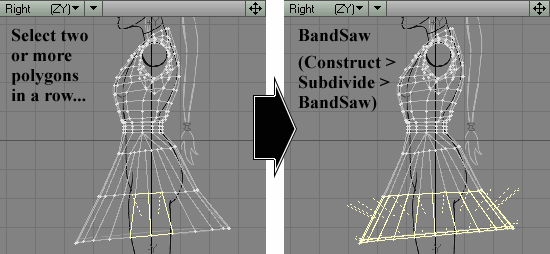
Figure 3
It should look like Figure
3. If not, type u to Undo the Bandsaw operation, push the
Bandsaw button again, and this time click on the "Reverse" button to flop
the position of the cut. Click on "OK." This time the cut should be on
the other side.
|
Figure 3 |
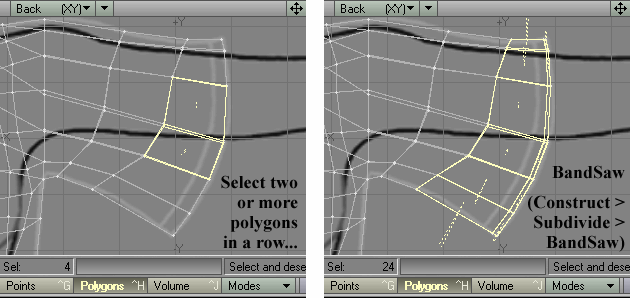
Figure 4 |
Note: Bandsaw does "listen" to the order in which you select the polygons. If you had selected the left polygon first, then the right polygon, dragging the red slider to the left would have put the cut on the bottom of the polygons, since "left" would have been defined as "the top." If you had selected the right polygon before you had selected the left polygon, then "right" would have been defined as "the top," and the same slider settings would have put a cut along the top of the polygons.
STEP 6: Deselect everything. Use Bandsaw to make a cut close to the edge of the sleeve of the arm. It should look like Figure 4.
STEP 7: Now you have thin bands of polygons circling both the
hem and the edge of the sleeve. Time to surface em. Deselect everything.
Select the thin bands of polygons at the edge of the skirt and at the edge
of the sleeve, and give them a gold surface called "Kara Tunic (Trim)."
(Figure 5)
Figure 5 |
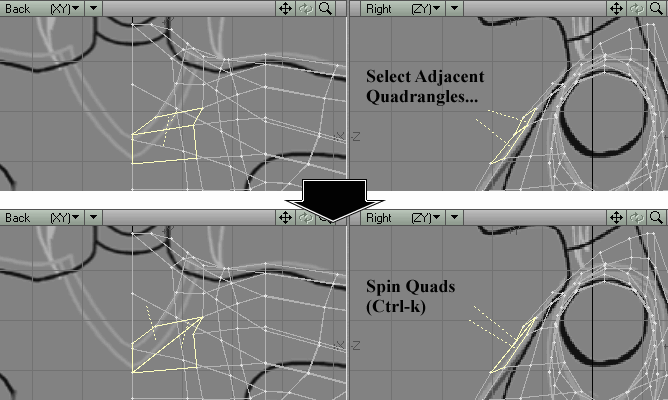
Figure 6 |
STEP 8: Now for the collar. Deselect everything and zoom in on the collar area. Make sure to set the display of the Perspective View to Wireframe Shade, if you have not done so already.
STEP 9: Time to whip out the Spin Quads. Select the two polygons shown in the upper panel of Figure 6 -- the ones that share the lowest inner point of the collar. Type Ctrl-k to perform a "Spin Quads" operation (Detail > Polygons > Spin Quads). In one shot, these polygons have been Merged and then Split into two quad polygons again -- only this time with their shared edge running in a different direction. (Figure 6)
Note: When it comes to tweaking the flow of polygons in a SubPatch cage, keep Spin Quads in mind.
STEP 10: Deselect everything. Of the six polygons that run alongside
the collar, select the topmost two in the back. Type Ctrl-k to Spin these
Quads until their shared edge runs from the central rear point of the collar
to the edge of the rest of the collar polygons. (Figure
7)
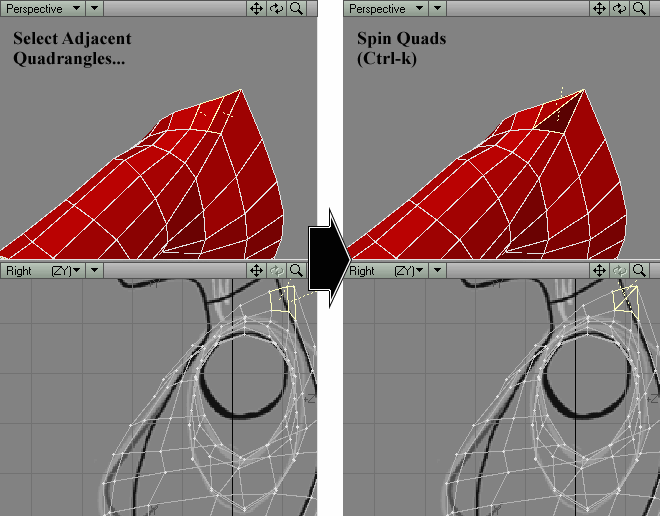
Figure 7 |
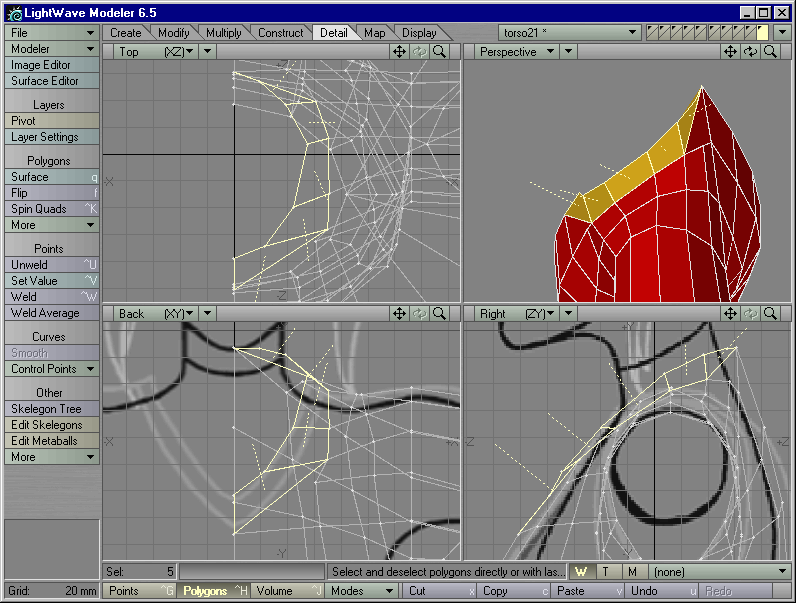
Figure 8 |
STEP 11: Deselect everything. Select the five polygons that now run alongside the collar, and assign the "Kara Tunic (Trim)" surface to them. It should look like Figure 8.
STEP 12: You might have noticed that the farther points are spaced
apart (whether SubPatches or splines), the softer the curves between those
points. As a test to this collar, Mirror the entire tunic on the X axis,
with Merge Points turned on. Hit the Tab key to turn on SubPatch surfaces.
The collar will probably look like Figure
9. The inner curve of the collar may not look sharp enough
when compared to the model sheet. (The sharp point of the lower curve is
most likely caused by the unusually high amount of SubPatches that share
corners there -- all six of them yanking on that poor point, all at once).
Undo the SubPatches and the Mirror.
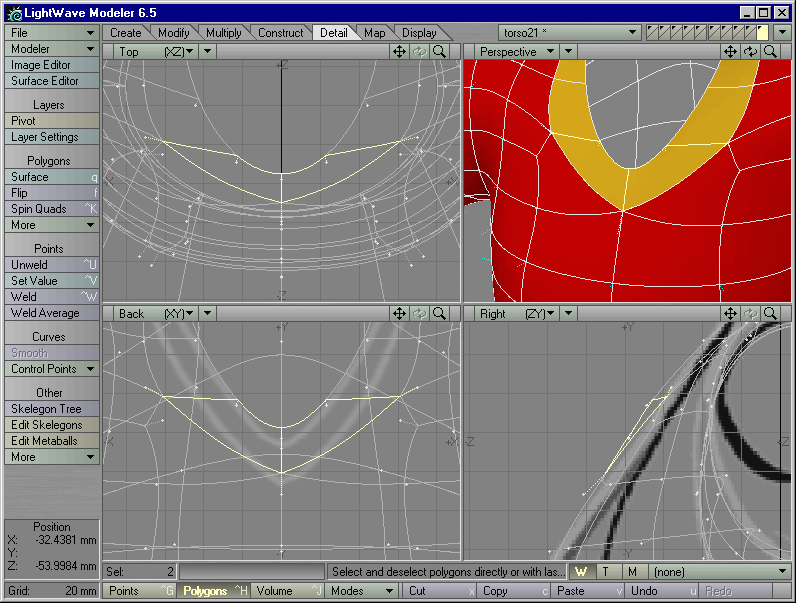
Figure 9 |
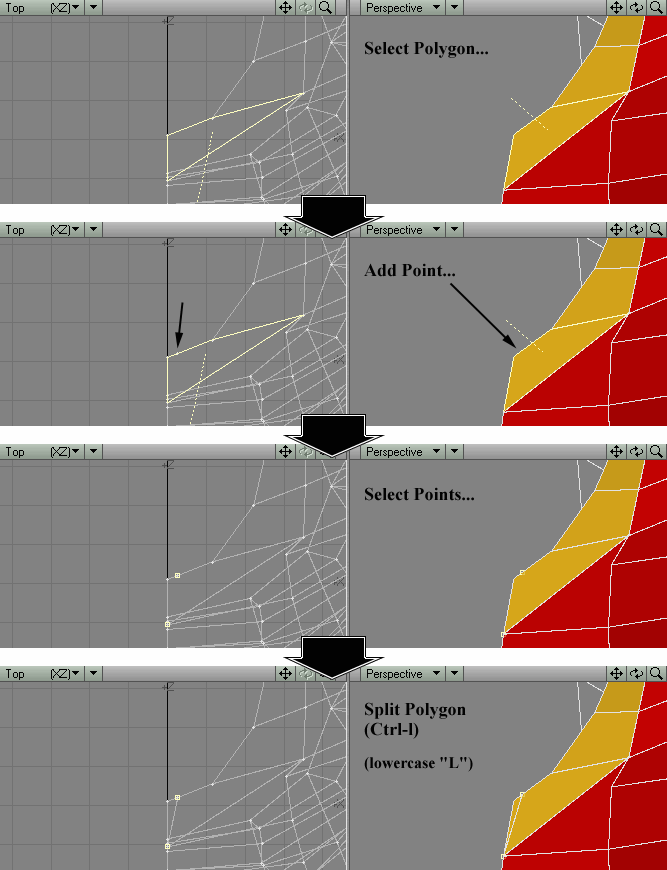
Figure 10 |
The farther apart points are spaced, the softer the curve. Conversely, the closer together points are spaced, the sharper the curve. We need more points at the inside curve of the collar. Add Points can give us that extra point...and Split Polygons will let us get away with it.
STEP 13: Deselect everything. Select the polygon shown in Figure 10 -- the one whose left edge defines the center of the front of the collar. We need an extra point close to the center of the inside of the collar, so use Add Points to give us that point. (Figure 10)
Now we have the points that we want, but SubPatch surfaces will never accept a five-point polygon as a SubPatch surface. Only triangles and quadrangles may be accepted.
Luckily, we can Split this pentagon into one quadrangle and one triangle.
STEP 14: Leave this five-point polygon selected in Polygon Selection Mode. Go into Points Selection Mode, deselect all points, then (on the selected pentagon) select the newly added point and the point that forms the center of the outer ring of the collar. Type Ctrl-l (that's a lowercase "L") to Split this pentagon into a quad and a triangle. Problem solved. (Figure 10)
When you next Mirror this mesh, the extra points on either side of the center point will help you control the sharpness of the innermost curve of the collar.
Speaking of which...
STEP 15: Mirror this mesh with Merge Points turned on to eliminate
any trace of a seam along the center. (Figure
11)
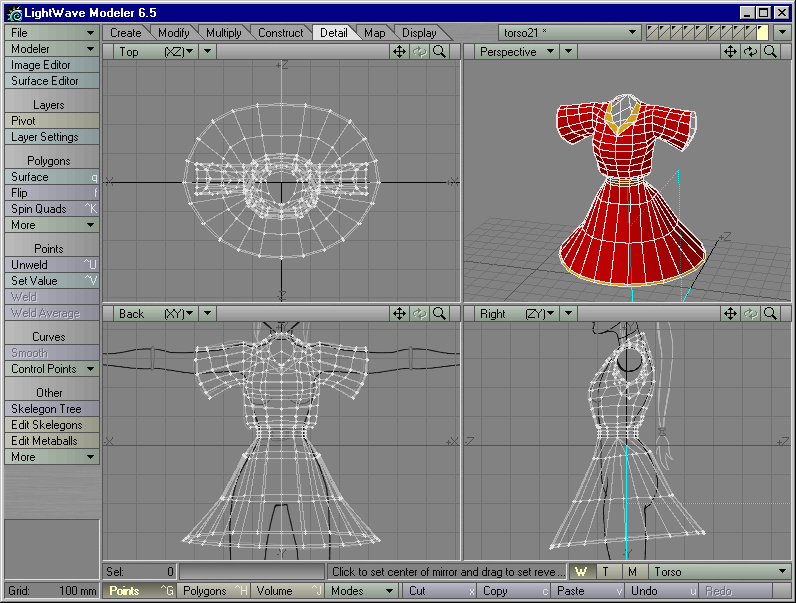
Figure 11 |
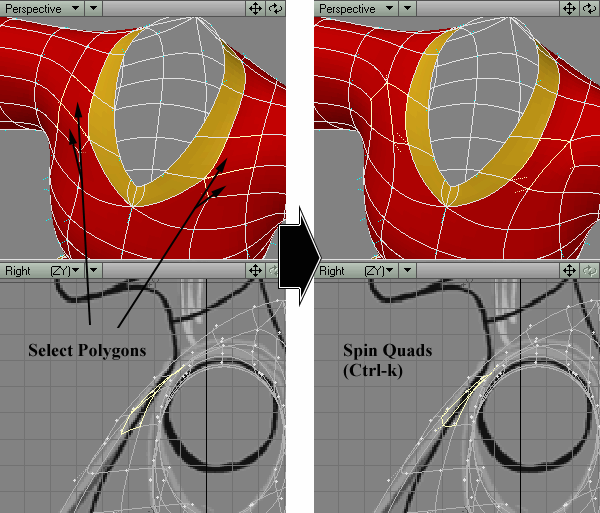
Figure 12 |
STEP 16: Hit the Tab key to convert this mesh to SubPatches.
Hm...the collar could look better. On either side it has five polygons sharing a corner at the outside edge -- tugging it out of shape. Spin Quads time.
STEP 17: Activate Symmetry Mode from the Modes drop-down list (found at the bottom of the screen). Select the adjacent quads shown in Figure 12 (the topmost, outermost two polygons of the two sets of five quads sharing a corner at the edge of the collar). Type Ctrl-k to Spin them until the collar looks nicer. (Figure 12)
STEP 18: The collar may look too broad. If so, deselect everything.
Leave Symmetry Mode turned on. Hit the Tab key to turn everything back
into Faces. Select the middle polygons of the collar and use the Drag tool
to move the side points of the outermost collar edge inwards, until they
touch the outer edge of the collar in the model sheet. Deselect everything
and hit the Tab key again -- the collar should now conform more closely
to the model sheet. (Figure
13)
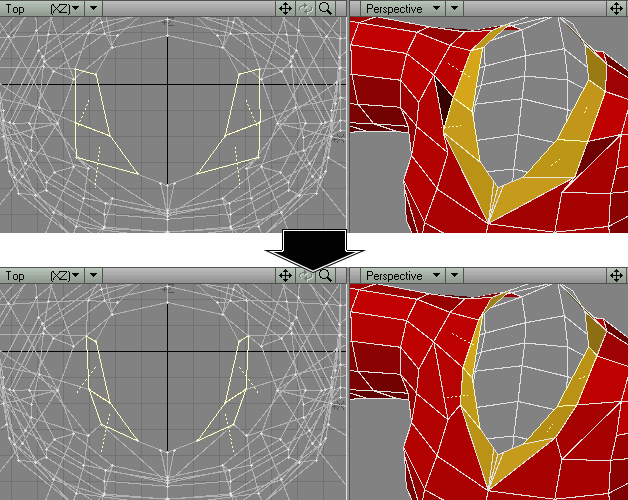
Figure 13 |
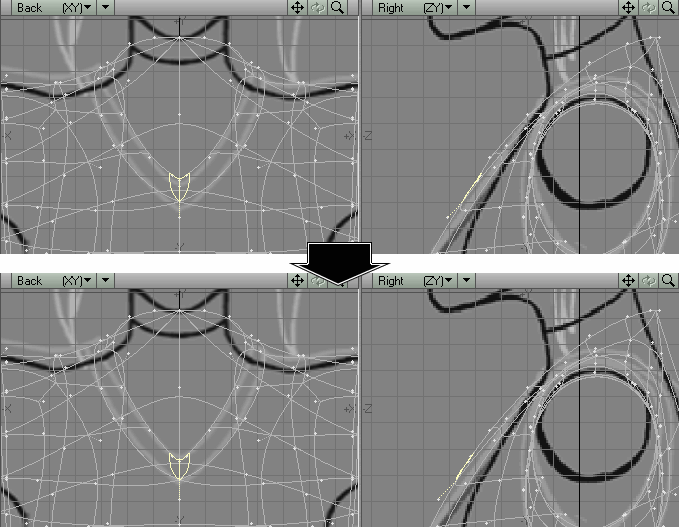
Figure 14 |
STEP 19: To be picky, the point of the collar on the model may not line up with the ink lines of the model sheet. If so, deselect everything. Select the two "triangles" in the center-front of the collar, as shown in Figure 14. In the Right View, move them along the slant of the chest until the contours of the collar better line up with the ink lines of the model sheet in the Back View. (Figure 14)
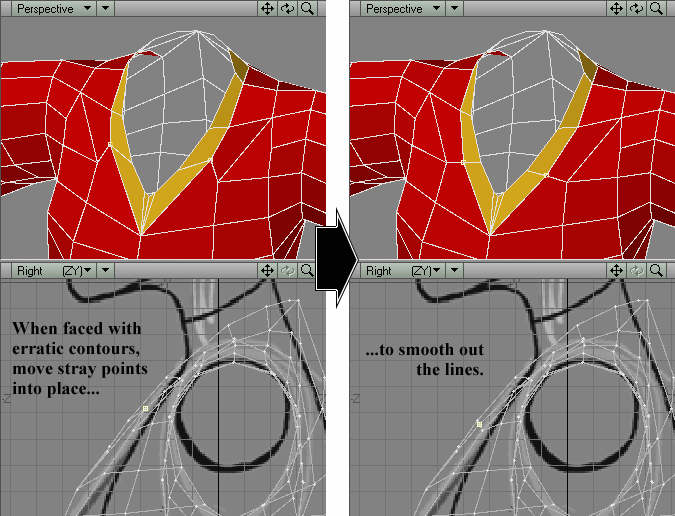
Figure 15
STEP 20: To be thoroughly picky, the flow of the points may not be perfect along the collar. Let's check. Deselect everything. Hit Tab to turn off SubPatches, but leave Symmetry Mode turned on. If any row of points looks uneven (like the rows of points second from the bottom of the collar in Figure 15), find the points that stray farthest from the others. Select these stray points (so that you can see them in each view more easily) and use the Drag tool to move them down until the lines running through them form a smoother contour in both the Back and Top Views.
Note: In Layout, "Edges" trace the edges of polygons. The most elegant polygonal meshes, then, should yield the most elegant ink lines. That said, Step 20 may be overkill for most situations, and you may consider it optional if you're in a hurry to get this tutorial done. Think of it as one of the many judgment calls you must make when modeling. How much is too much?
STEP 21: Save this object as torso22.lwo.