Figure 1
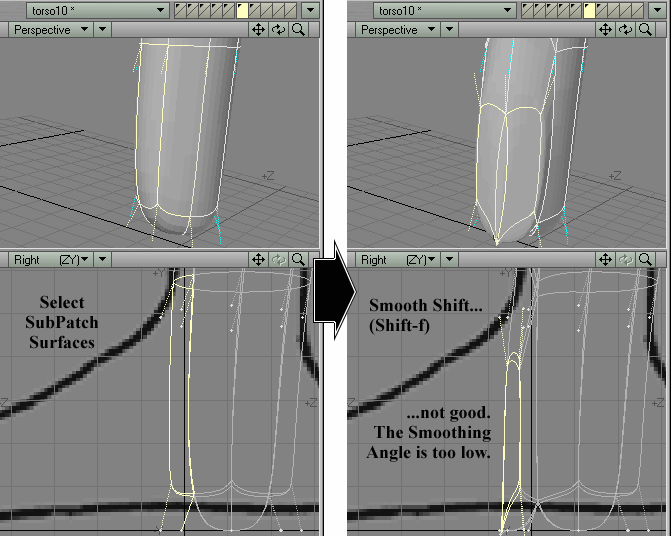
Figure 2
STEP 2: Set the Perspective View's display type to Wireframe Shade.
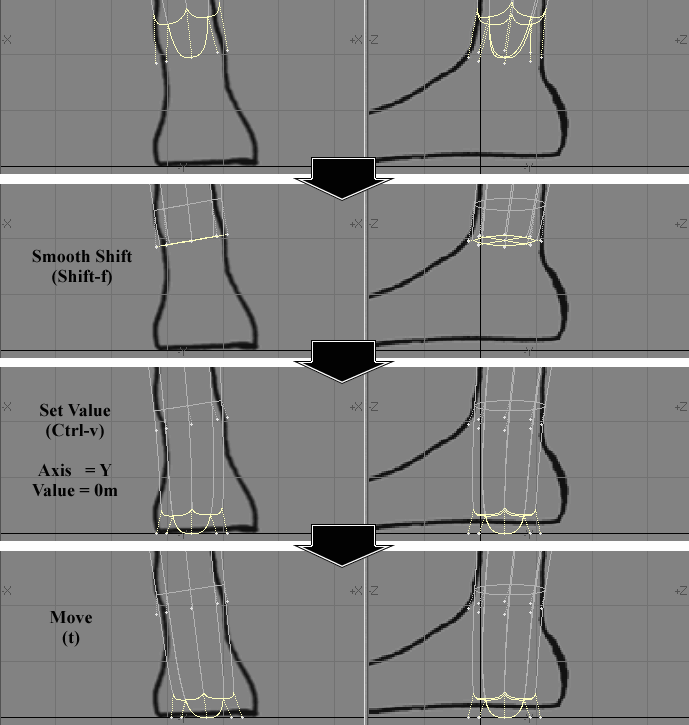
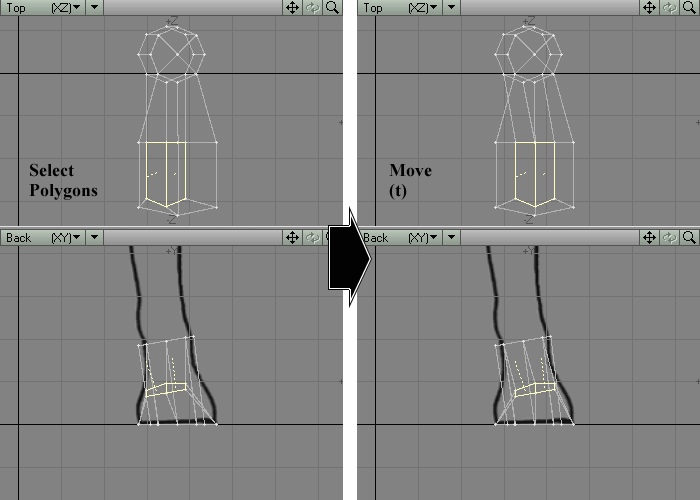
STEP 3: Select the four polygons at the stump of the ankle. Type Shift-f to activate Smooth Shift. Right-click on these selected polygons once to create new geometry between them and the stump of the ankle. Then type Ctrl-v to activate Set Value. Choose 0m on the Y axis to force these polygons to snap to the ground. (Figure 1)
STEP 4: Type t to activate the Move tool. Holding down the Ctrl
key to restrict movement to one axis, slide these polygons over to the
right in the Back View, until it resembles the last panel of Figure
1.
|
Figure 1 |
Figure 2 |
STEP 5: Deselect everything. In the Right View, select the two
leftmost SubPatches from the ring of SubPatches that forms the stump of
the foot. Type Shift-f to activate Smooth Shift. Left-click in the Right
View and drag slightly to the right. You might get the error shown in Figure
2. If you do, however, here's how you fix it. Type n on
your keyboard to bring up the numeric panel for Smooth Shift. Left-click
on the slider next to Max Smoothing Angle and drag to the right until the
problem disappears. (Figure
3)
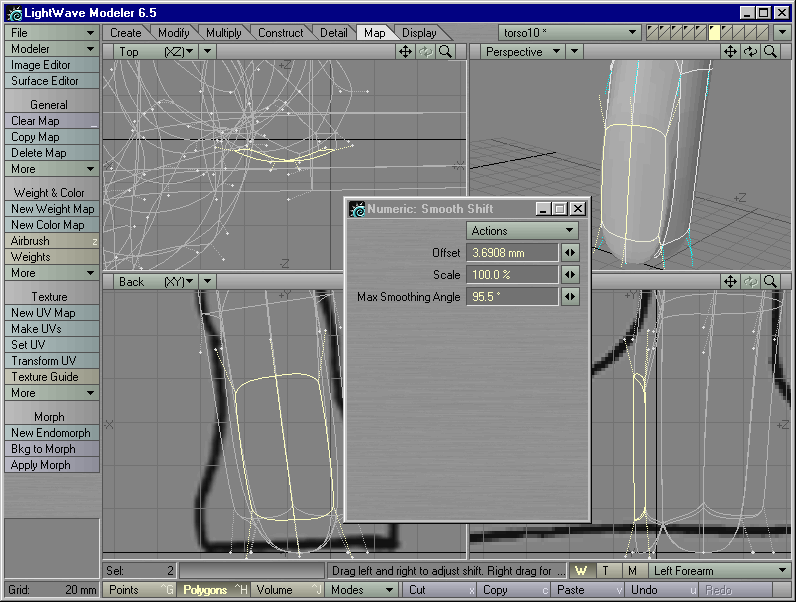
Figure 3 |

Figure 4 |
STEP 6: While you're in the numeric panel for Smooth Shift, change the Offset to 0m. (That way you get the extra geometry without the points shifting away). Exit the Smooth Shift panel and activate the Move tool. Hold down the Ctrl key to restrict movement to one axis. In the Right View, drag the selected polygons out towards the toe. Stop when the points reach the end of the toe in the model sheet. (Figure 4)
STEP 7: Deselect everything. In the Right View, select the three points that form the top of the "toe." Move these points down until they touch the top of the toe in the model sheet. (Figure 4)
STEP 8: Let's see how this looks as a cage. Deselect everything, and type the Tab key to convert everything back into faces.
STEP 9: In the Right View, use the Knife tool to slice through
the foot between the toe and the ankle. Select the top points created by
this slice, and Move them down on the Y axis until they lie underneath
the ink line of the model sheet. (Figure
5)
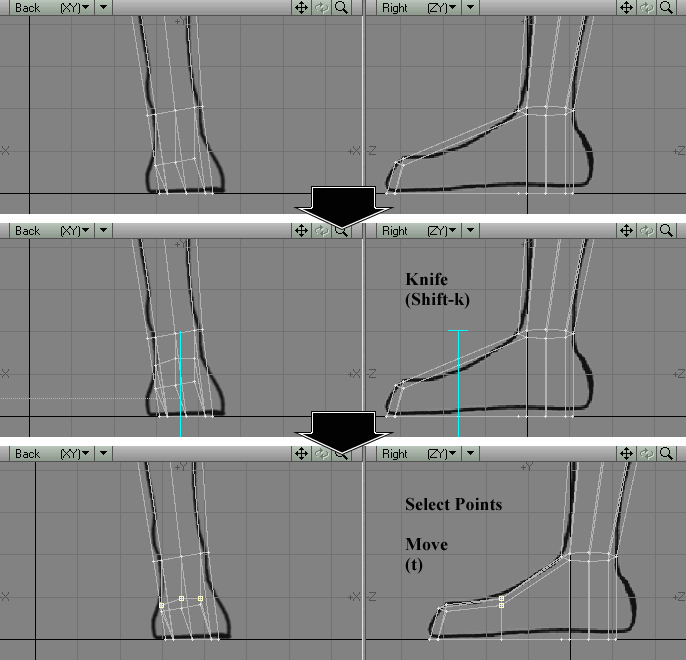
Figure 5 |
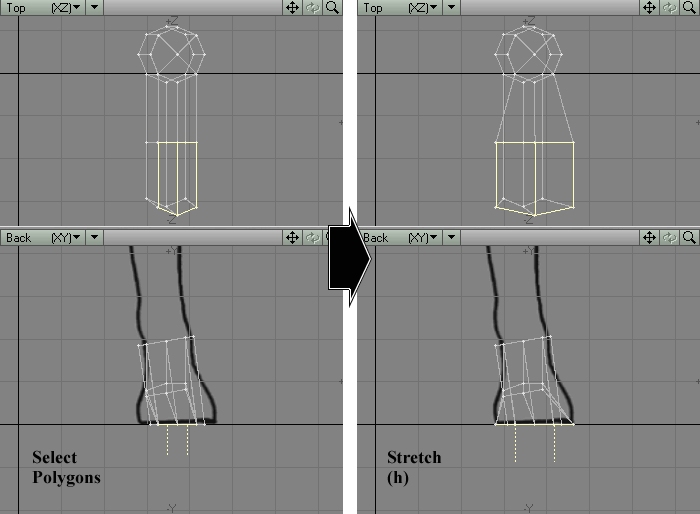
Figure 6 |
STEP 10: It'll be easier to work on this with the Top View uncluttered. Select the polygons of the foot, and tap the = key (the "equal sign" on your keyboard) to hide all unselected geometry (in this case, the rest of the body).
STEP 11: Select the two polygons of the toe section that lie flat on the floor. Use the Stretch tool in the Back View to make these polygons touch the ink lines that define the sides of the foot in the model sheet. (Figure 6)
STEP 12: Deselect everything. Select the two polygons that form
the top of the toe. In the Top View, Move these two polygons to the right
until the center line of the top of the toe lines up with the center line
of the bottom of the toe. (Figure
7)
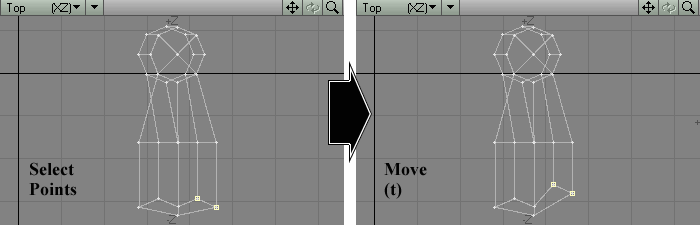
Figure 7 |
Figure 8 |
STEP 13: In the Top View, select the two points that form the outer corner of the toe. Move these back towards the ankle to give the toe a more rounded appearance. (Figure 8)
Looking at the Back View, the top of the foot is angled the wrong way. This foot is currently tallest at its rightmost edge, and shortest at the leftmost edge. It should be the other way around, getting shorter as you go towards the side of the little toe.
STEP 14: Deselect everything. Select the two polygons that form
the top of the toe again. Type y to activate the Rotate tool. In the Back
View, Rotate the two polygons until the rightmost edge is lower than the
leftmost edge. (Figure 9)
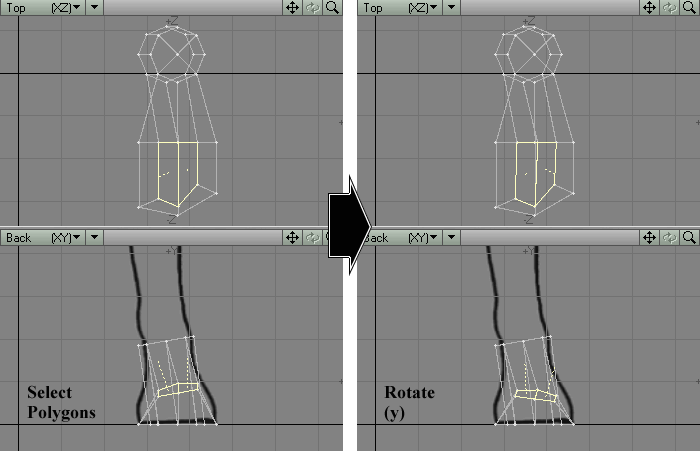
Figure 9 |
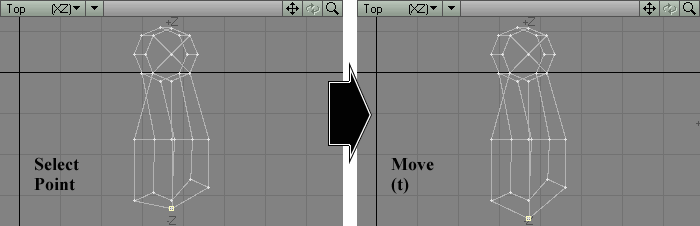
Figure 10 |
The points of the bottom of the toe are not spaced evenly with the points of the top of the toe. This will cause an unevenly curved edge around the toe. We'll fix this problem in the next step.
STEP 15: In the Top View, select the center point of the bottom three points of the foot. Move it away from the ankle until the distance between it and its counterpart on the top of the toe matches that of the other two pairs of points on either side of it. (Figure 10)
STEP 16: This toe will need extra geometry if it is going to
maintain its volume while bending. In the Right View, use the Knife tool
to make two slices on either side of the center of the foot. (Figure
11)
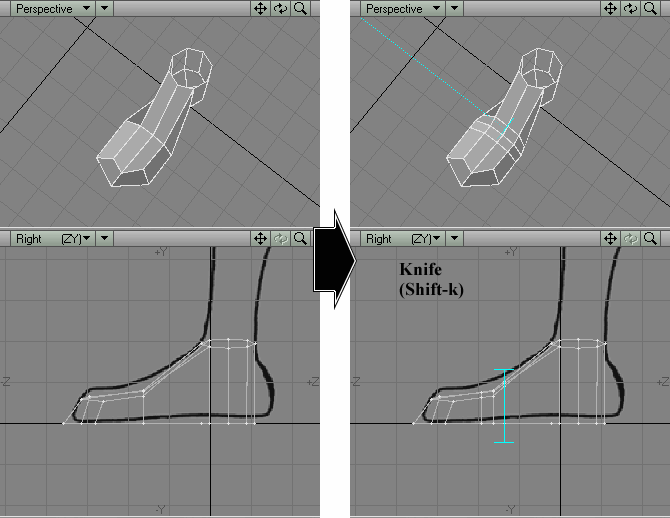
Figure 11 |

Figure 12 |
STEP 17: This foot could use a heel, too. In the Right View, select the two polygons that form the rear of the foot. Right-click on them once to Smooth Shift them out, then use the Move and Stretch tools to get the new points to fit the general shape of the rear of the foot on the model sheet. (Figure 12)
Not bad, save for two things: in the Back View, you can see that the rear of the heel is slanted oddly, and in the Top View, you can see that the bottom of the foot has a weird shape. We'll fix both in the next two steps.
STEP 18: Select the center three points of the heel. In the Top
View, Move them over to the right until they line up with their counterparts
on the bottom of the heel. (Figure
13)
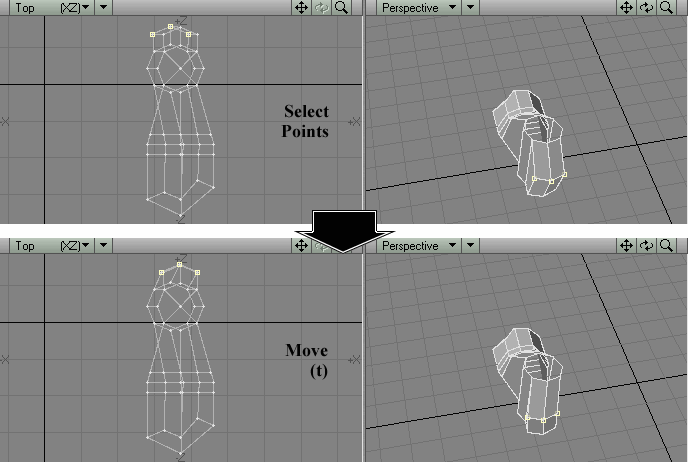
Figure 13 |
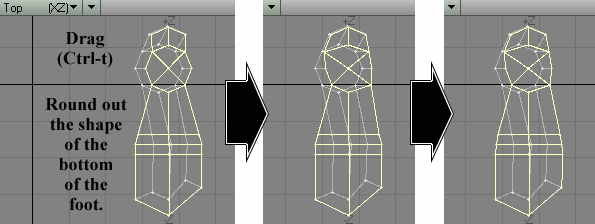
Figure 14 |
STEP 19: Deselect everything. Select all of the polygons that form the bottom of the foot. Type Ctrl-t to activate the Drag tool. In the Top View, drag the points of these polygons around until the polygons start to look like the footprint of a sneaker. Make the outline look as rounded as possible. (Figure 14)
STEP 20: Deselect everything. Select all of the polygons that
form the top of the toe. In the Top View, Drag the points of these polygons
around slightly to make their edges look as rounded as possible. (Figure
15)
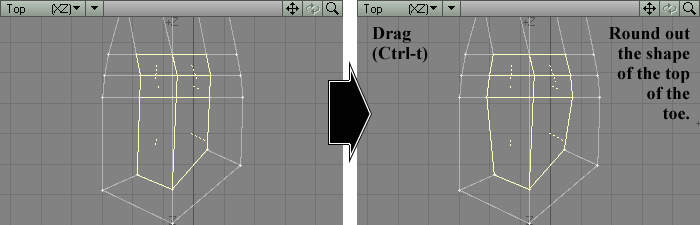
Figure 15 |
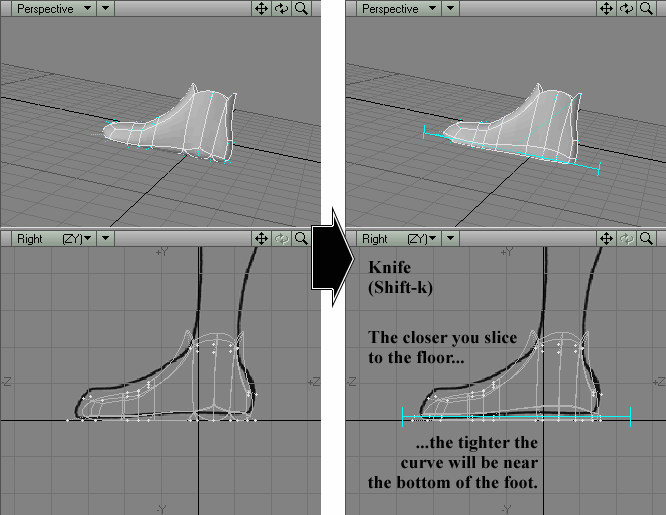
Figure 16 |
STEP 21: Let's make sure that this foot lies flat on the floor. Select all of the points that form the bottom of the foot. Type Ctrl-v to bring up the Set Value tool, and set their value to 0m on the Y axis.
STEP 22: Hit the Tab key to convert this foot back into SubPatches. Hm, looks more like a sock than a boot.
STEP 23: Easily fixed. In the Right View, Knife through the length of the foot, keeping as close to the bottom of the foot as possible. Hold down the Ctrl key while you do this, to keep your slice perfectly straight. This extra row of points, closely spaced to their counterparts on the floor, will sharpen the curves of the SubPatch surfaces that run through them. (Figure 16)
This foot is just about ready to go, but for aesthetic purposes, let's make that "circle" on the underside of the foot blend in better with its neighbors.
STEP 24: Deselect everything. Hit the Tab key to convert everything back into faces, so that it will be easier to edit this mesh. Select the four polygons that form a noticeable "circle" on the bottom of the foot, and type the = key again to hide everything that is not selected.
STEP 25: Leave these polygons selected as you go into Points
Mode. Select the center point and the four points shown in the first panel
of Figure 17.
Type Ctrl-l (that's a lowercase "L") to Split these polygons into triangles.
(Figure 17)
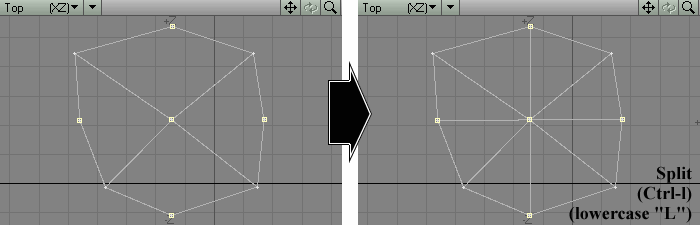
Figure 17 |
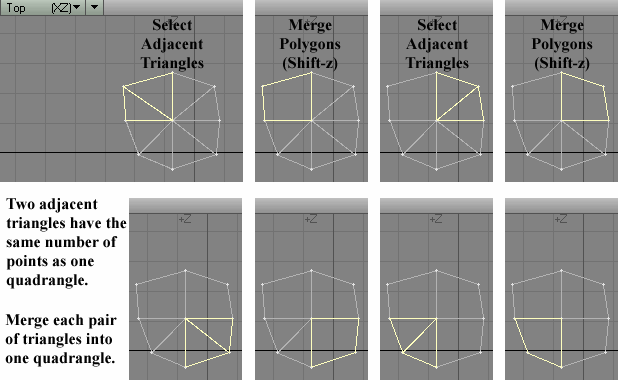
Figure 18 |
STEP 26: Go back into Polygon Selection Mode. Deselect everything. In the Top View, select the two triangles in the uppermost left-hand corner, and type Shift-z to Merge them into a quadrangle. Do the same to the rest of the triangles, as shown in Figure 18.
STEP 27: Type \ to unhide everything. The underside of the foot now has a more aesthetically pleasing flow of polygons.
STEP 28: Hit the Tab key to convert everything into SubPatches. Notice that the ankle looks a bit too wide in the Right View.
STEP 29: In the Back View, use the Knife tool to slice through the leg, slightly above the ankle. Try to match the angle of the points of the ankle when you make your cut. The extra SubPatches will tighten the curves of the ankle. (Figure 19)
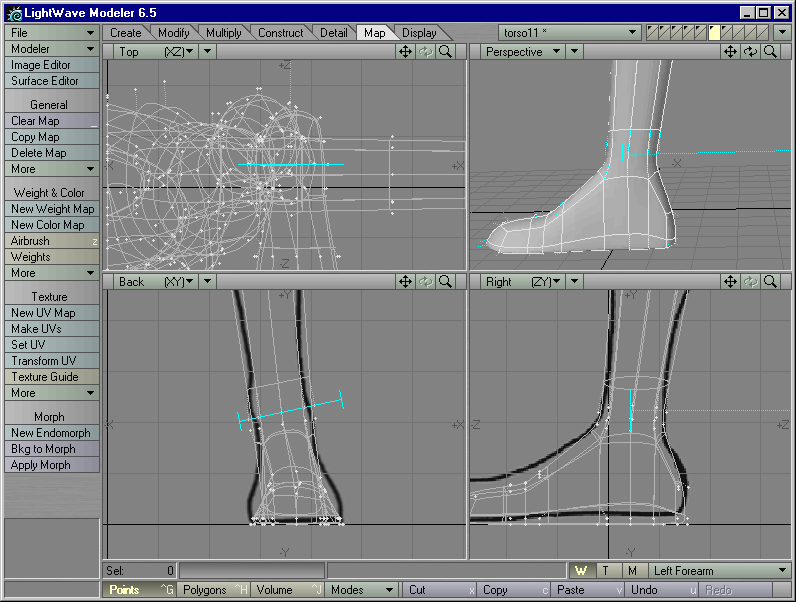
Figure 18
STEP 30: This foot is good enough for now. Save this mesh out as torso11.lwo.