The Torso

Most people would rather build a head than a torso, but this tutorial will start with the torso. The torso cage is simpler, so you'll get more spline modeling experience before approaching the more complex form of the head.


Note: Also, because the head has a more complex form, starting with the head risks letting its complexity trickle into the rest of the mesh. When you have a lot of polygons bordering the neck, you'll hesitate to fight it. You'll force the torso to fit the head, rather than the other way around. Then you'll end up with more polygons than you need to define the shoulders, the chest...the unneccessary complexity might even trickle into the extremities.

In short: you'll have let a relatively small area of geometry determine the polygon count of your entire model; the modeling equivalent of forcing the rest of a drawing to fit a small detail that has already been drawn.

Start with the general before moving on to the specific.

(Those who have extensive modeling experience already know enough to look out for this modeling trap, and can start with any part of a model that they wish. For this tutorial, however, we will begin with the torso).


Figure 1
Figure 1

First, a few tips about building a model for celshading:

  1. When modeling a character, worry first about how its Silhouette Edges will appear in Layout. You can fake the other edges. With bump and diffuse maps, you can even fake most shading details (such as the tendons on the back of a hand). But you cannot fake Silhouette Edges. Silhouette Edges occur wherever the polygon normals start to angle away from the camera (Figure 1).
  2. The smoother the polygonal mesh, the better the inking will look, because LightWave's Edges selectively trace existing polygon edges. Any unplanned bumps and dents in your model will cause unwanted Silhouette Edges in your render. (This is part of the reason people have trouble celshading a "Poser" model -- it often has too many anatomical details in it that break up the inking and shading).
  3. Real cartoons stylize reality. The Super Cel Shader alone cannot make a model look like a cartoon -- the model must also have the stylized form of a cartoon. (This is another reason why people find it tough to celshade a non-cartoony "Poser" model -- the characters of Akira look nothing like "Generic Man").
  4. The simpler the subdivision cage, the smoother the mesh will look. The smoother the mesh, the smoother the shading. The smoother the shading, the nicer the celshading will look.
  5. Rounded forms shade best for an organic character model. Almost the entire torso can be broken down into cylindrical forms (neck, waist and arm). It's the more complicated chest and shoulder areas, plus the question of how these cylinders should connect to each other that drives one to splines.

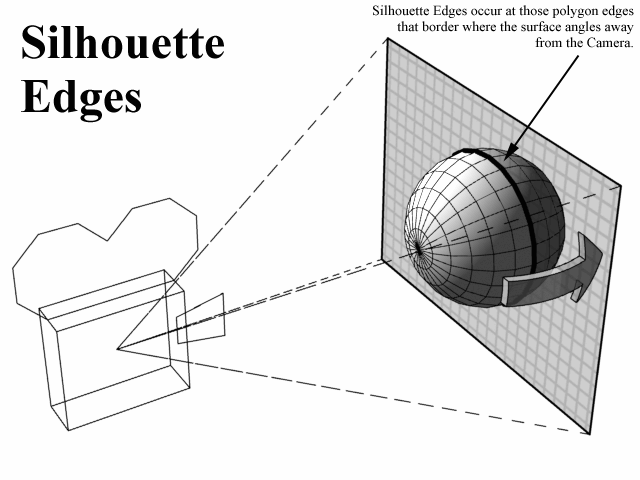
Note: Some might suggest that fresnel "inking" (such as the Bump Edges feature of Super Cel Shader) can substitute for Silhouette Edges, since fresnel inking is also angle-based. Fresnel inking can look fine in still images, but the illusion of a hand-drawn ink line often disappears during an animation. Try fresnel inking an animation of a human hand -- an artist once put it best when he compared the effect to "crawling highlights."

Table of Contents Next Page