Figure 1
Relying solely upon the menu system has never affected the quality of anyone's work, but it certainly cuts into one's modeling speed. It might not seem like much time is being wasted, when it only takes a few seconds to find the right button. However, those seconds do add up - especially when one is trying to get into a rhythm of selecting, editing, selecting, editing.
Learn the hot keys, learn the hot keys, learn the hot keys. They transform the Modeler program into an artist's tool. Almost every button in Modeler has a keyboard shortcut written on it, and we can set our own hot keys as well.
Figure 1
In LightWave 5.6, the hot key Ctrl-x had nothing assigned to it by default. In versions 6.0 and up, Ctrl-x activates the Pan Tool by default. For this chapter, let's associate Ctrl-x with "Add Points" instead.
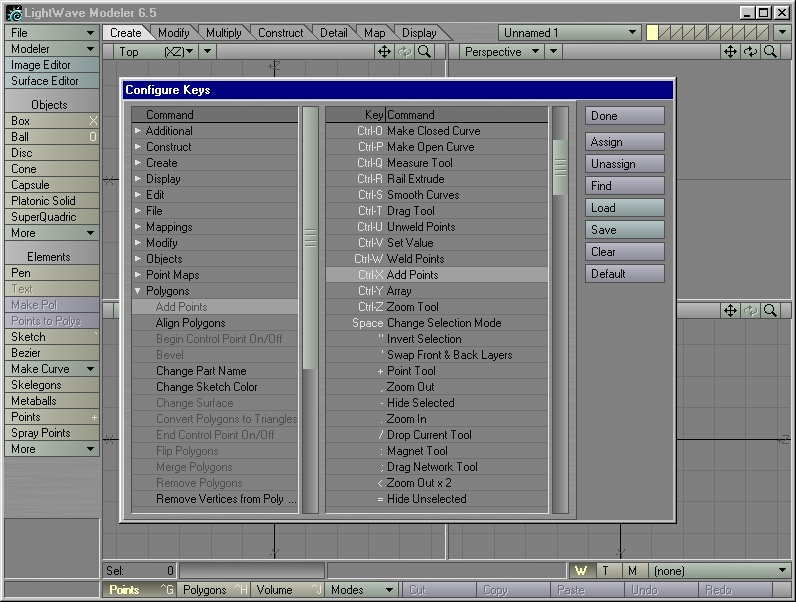
STEP 2: In the Key|Command window, move the slider down until you see "Ctrl-X."
STEP 3: Move the mouse pointer over the text string "Ctrl-X" and left-click on it once. "Ctrl-X" should now be highlighted.
STEP 4: The left column of the Command window lists several categories. Each category has a small triangle to its left. Left-click on the triangle next to "Polygons." A list of all commands that fall into the "Polygons" category should appear, including the command "Add Points."
| Note: Before LightWave 6.5, the Command window had all possible commands in one long list. As of 6.5, these commands have been organized into collapsible groups. The small triangles indicate whether or not a group is collapsed. If it points to the right, the group is collapsed. If it points down, the list of commands that belong to that group is visible. Left-click on the triangles to hide and unhide the commands that belong to each group. |
STEP 5: Move the mouse pointer over the text string "Add Points" and left-click on it once. "Add Points" should now be highlighted.
STEP 6: In the column of buttons on the side, left-click the "Assign" button. "Ctrl-X" should now have the text string "Add Points" next to it (Figure 1).
STEP 7: Click "Done" to exit the Configure Keys window.
| Tip: If at any point you want to change the settings back to LightWave's default, press F1 to bring up the Config Keys menu and click that menu's "Default" button. Those settings would then be used in both the current and future sessions of Modeler. |
We still have a hot key for the Pan tool: the Alt key. Whenever you hold down the Alt key, you can Pan through the orthogonal views with the mouse (by holding down the left-mouse button and moving the mouse pointer around the window).
To use the mouse to Pan through the Perspective window, hold down both the Alt and Shift keys at the same time. (For the Perspective window, holding down the Alt key lets you rotate the view with the mouse).